Open topic with navigation
Create Worship Rooms and Locations
This step is critical in that it will satisfy the goal of allowing you to track headcount and volunteer attendance and help you keep track of your volunteer scheduling. Rooms & Locations (or RLCs) will also allow you to use Check-in to take attendance for your volunteers.
To create RLCs:
- Click Ministry > Activity/Room Setup > Rooms & Locations. The Add/Edit Room, Location, Class form appears. Ensure the worship service activity is displayed before you begin completing the fields. If the activity is not displayed, check the ministry box at the top of the screen and the Show activity drop-down at the bottom of the page.
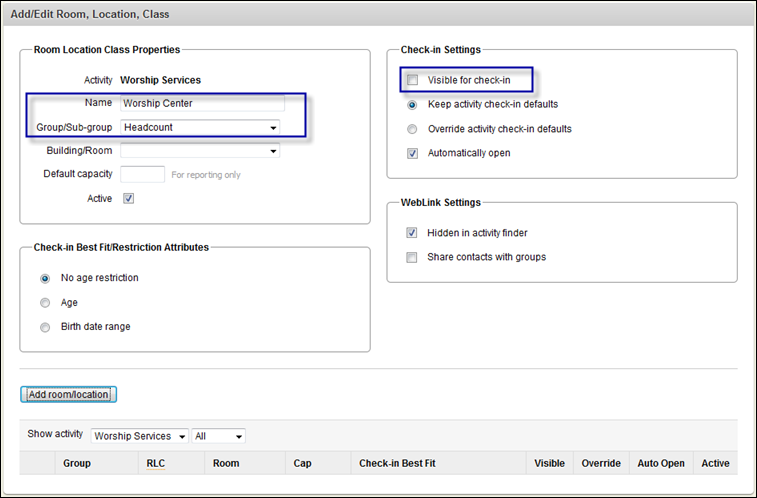
- In the Room Location Class Properties box, type Worship Center in the Name field. Obviously, you may type the name that you use to refer to the worship service location at your church.
- Select Headcount from the Group/Sub-group drop-down list.
- In the Check-in Settings box, clear the Visible for check-in box.
 Your screen should look like this

- Click Add room/location.
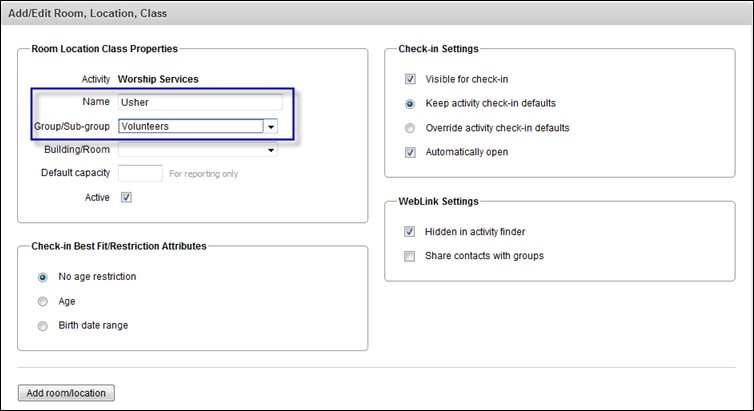
- In the Room Location Class Properties box, type Usher in the Name field. You are now creating volunteer specific locations that you will later use to communicate with and track volunteers. You may name this anything you like. Some churches use the location the person is serving rather than the name of the job. For example, "East Entrance".
- Select Volunteers from the Group/Sub-group drop-down list.
 Your screen should look like this

- Click Add room/location.
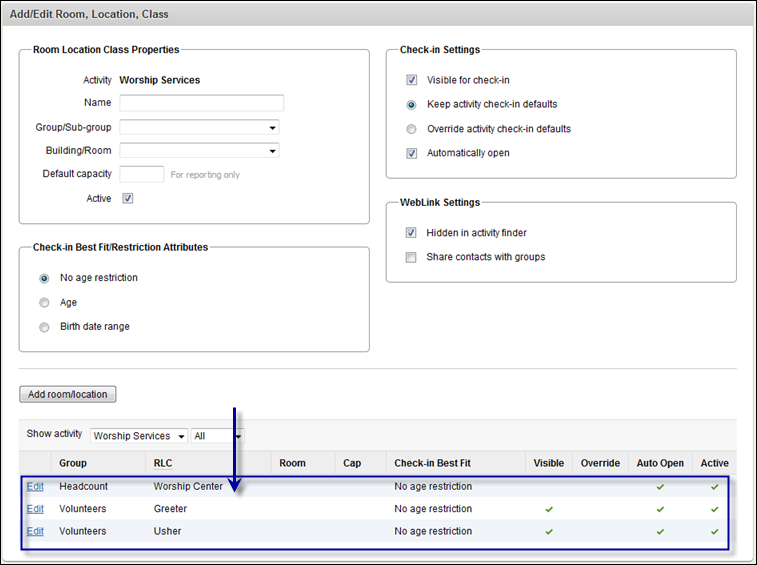
- Repeat steps 6-8. This time add a Greeter room/location. You may repeat these steps if you have additional volunteer jobs you would like to add such as Parking Attendants, Hospitality, Info Center, Guest Services, and so on.
 Your screen should look like this

Go to next step
![]() Your screen should look like this
Your screen should look like this![]() Your screen should look like this
Your screen should look like this![]() Your screen should look like this
Your screen should look like this![]() Your screen should look like this
Your screen should look like this![]() Your screen should look like this
Your screen should look like this![]() Your screen should look like this
Your screen should look like this